Create KWB-R Package from Scratch
Michael Rustler, Hauke Sonnenberg
2024-09-05
Source:vignettes/tutorial.Rmd
tutorial.RmdThis tutorial explains how to setup an R package so that it complies with a default style. We apply this default style to all KWB-packages that we host on our GitHub account KWB-R. The aim is to present all packages in a common manner (consistent DESCRIPTION and documentation) and to use the same services (continuous integration, code coverage) for all our packages.
This package provides functions to:
- generate a DESCRIPTION file in which fields are already set to “our” defaults. For example, the licence field is set to the open source licence MIT. An additional LICENCE file is added that informs about KWB being the copyright holder of the package.
- generate files that control the automatic generation of documentation files.
- generate files that control continuous integration, i.e. the automatic building and testing of the package.
1 Install required R packages
Before you can use the package kwb.pkgdown you need to
- install packages that kwb.pkgdown relies on from the Comprehensive R Archive Network (CRAN),
- install kwb.pkddown from GitHub.
Install required packages that are not yet available in your local R user library from CRAN:
# Define the names of required packages:
# - remotes: functions to install R packages from Github
# - pkgdown: functions to create a package website
required <- c("remotes", "pkgdown")

# Get the names of packages that are already installed
installed <- rownames(installed.packages())

# Determine the packages that are not yet installed
packages <- setdiff(required, installed)

# Install the packages from CRAN
for (package in packages) {
  install.packages(package, repos = "https://cloud.r-project.org")
}
The remotes package should now be installed. It allows to install
further R packages directly from GitHub. Therefore, the functions of the
remotes package need to communicate with the GitHub server. To gain
authenticated access to the GitHub server we set a so called Private
Access Token (PAT) in the following. This token is then automatically
used whenever the GitHub server is accessed. Please see the Installation vignette to learn how to get your
personal GitHub PAT and use that token instead of
Put your Private Access Token here in the following
command:
Sys.setenv(GITHUB_PAT = "Put your Private Access Token here")Now, that the access token is set, you can use
install_github() from the remotes packages to install the
latest version of this package directly from our GitHub account:
remotes::install_github("KWB-R/kwb.pkgbuild")2 Configure and create your package
Secondly, personalise your R package by adapting a default template
that we propose for KWB packages and that is contained in the R package
kwb.pkgbuild.
2.1 Prepare a package directory
The source code of your package should be under version control. We
encourage you to create a GitHub repository on our GitHub account that represents the
package. Having a package as a repository on GitHub has the advantage
that it can be easily installed directly from there with no more than
running
remotes::install_github("kwb-r/<package_name>"). Once
you have created the GitHub repository, clone
it to a folder on your local machine.
You can let RStudio do the cloning for you. Therefore,
- select “File > New Project…” from the main menu,
- select “Version Control > Git”,
- set “Repository URL” to your new repository, such as
https://github.com/kwb-r/<package_name>, - set “Project directory name” to your
<package_name>(this should be the default), - set “Create project as subdirectory of” to the folder in which you
want to store your local copies of your github repositories, e.g. to
~/github-repos. - click on “Create Project” to let RStudio copy the package repository from GitHub onto your local machine.
For the steps described in the following, you need to provide the
name of the package in a variable package and the path to
the local directory to which GitHub repositories are cloned in a
variable repo_dir:
# Set the name of your (!) new package
package <- "kwb.newpackage"

# Set the path to your (!) local folder to which GitHub repositories are cloned
repo_dir <- "~/github-repos"
2.2 Create empty R package
# Set the path to the package directory
pkg_dir <- file.path(repo_dir, package)

# Create directory for R package
kwb.pkgbuild::create_pkg_dir(pkg_dir)
#> C:\Users\RUNNER~1\AppData\Local\Temp\Rtmp6NvPNq/kwb.newpackage is a valid 'root_dir' for pkg 'kwb.newpackage'
#> [1] "C:\\Users\\RUNNER~1\\AppData\\Local\\Temp\\Rtmp6NvPNq/kwb.newpackage"

# Create a default package structure
withr::with_dir(pkg_dir, {kwb.pkgbuild::use_pkg_skeleton(package)})
#> ✔ Setting active project to
#>   "C:/Users/runneradmin/AppData/Local/Temp/Rtmp6NvPNq/kwb.newpackage".
#> ✔ Writing kwb.newpackage.Rproj.
#> ✔ Adding ".Rproj.user" to .gitignore.
#> NULL
2.3 Parameterise your R package
In the following, we present the commands required to setup and
create your new package. We suggest that you write the corresponding
code into a .R script file
(e.g. setup_package.R). Once the package is created, we
suggest to put the script file into the inst/extdata folder
of your package. This makes the creation of the package reproducible and
can be used as a template for the creation of further packages.
Author
Minimum requirement: the author needs at least to have a (full) name:
author <- list(name = "Max Mustermann")You can add further information such as a personal website or the ORCID of the author:
author <- list(
  name = "Michael Rustler",
  orcid = "0000-0003-0647-7726",
  url = "http://mrustl.de"
)
The ORCID uniquely identifies the author of a web ressource and thus allows to find different works of one and the same author on the web.
If you do not know your ORCID, have a look at our package kwb.orcid. It allows to search ORCIDs by name, once you have created an account at orcid.org.
In addition, this package stores the ORCIDs of KWB researchers of whom we know their ORCID. Once you have kwb.orcid installed, you can access these ORCIDs with:
kwb.orcid::get_kwb_orcids()
#>     Andreas Matzinger    Christoph Sprenger          Daniel Wicke
#> "0000-0001-5483-4594" "0000-0002-0178-6645" "0000-0002-5722-5433"
#>      Hauke Sonnenberg       Michael Rustler       Nicolas Caradot
#> "0000-0001-9134-2871" "0000-0003-0647-7726" "0000-0002-5252-4880"
#>         Wolfgang Seis
#> "0000-0002-7436-8575"
Package description
The package description needs three entries
name: name of the package
title: title of your R package (which is automatically converted to title case with the function
tools::toTitleCase())desc: package description. Should be at least one sentence long and needs to end with a period!
description <- list(
  name = package,
  title = "My new KWB R package",
  desc  = "My super cool new R package in KWB default styling."
)
2.4 Create R package structure in KWB-R style
Running the following code not only creates an R package structure but also adds some KWB-R specfic styling, e.g.:
-
Adding configution files for:
Continous integration on windows (https://appveyor.com) and linux (https://travis-ci.org/KWB-R)
Code coverage in R package using the servive codecov.io
Backup of Github repositories on our mirrored KWB-R group on Gitlab
Indicates the current lifecycle of the R package according to https://www.tidyverse.org/lifecycle/
Uses by default the permissive
for all public R packages currently hosted on Github (see: http://kwb-r.github.io/status/) and lists KWB as copyright holder (see e.g. here)
Creates
READMEfiles (README.RmdandREADME.md) for the above mentioned topics andPrepares a KWB-R flavored documentation website template named
_packagedown.ymlneeded by http://pkgdown.r-lib.org/
Running the following R function will create the R package with the
version = 0.0.0.9000 and development stage
experimental (defined here).
2.5 Add your R functions
Add your R functions in the folder R/. By using
usethis::use_r with the parameter name =
function an empty R script is already stored in the right
folder R/.
usethis::use_r("function")For writing your R code/functions please follow the tidyverse coding style (https://style.tidyverse.org/), which serves as our default KWB-R style.
Now you just need to fill it with content (i.e. your functions) and
document it using roxygen2.
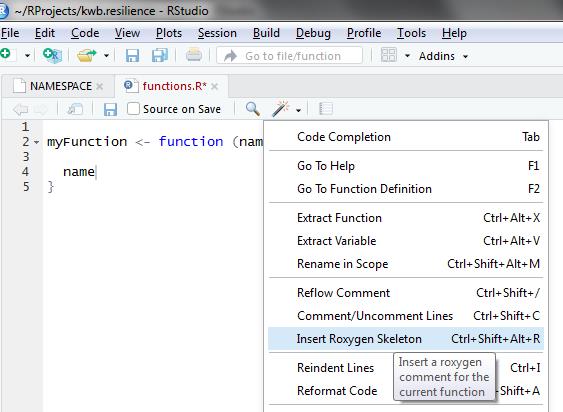
If you have already defined a function you can add a roxygen2
skeleton by using clicking on the Insert Roxygen Skeleton
button in RStudio as shown below.

More information on documentation in R is provided here: http://r-pkgs.had.co.nz/man.html
3 Check your package
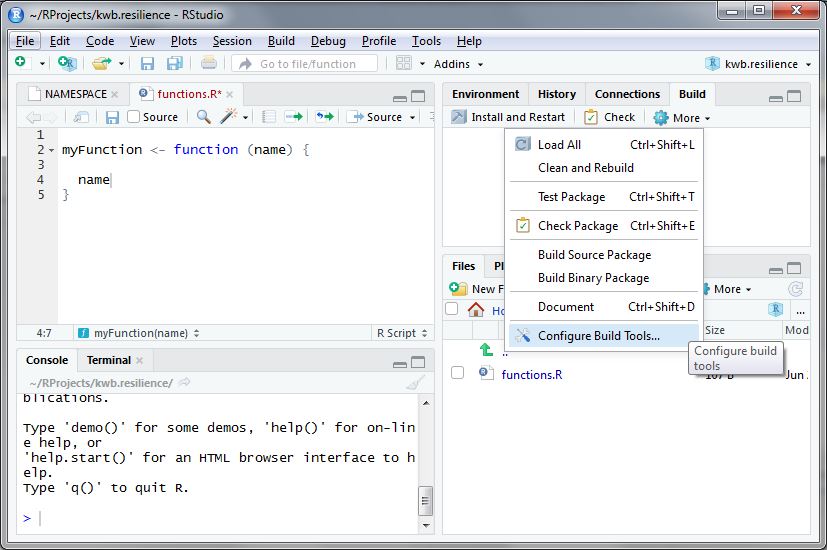
Once you completed all the steps above go to the upper right panel in
RStudio and click on Build -> More ->
Configure build tools as shown below.

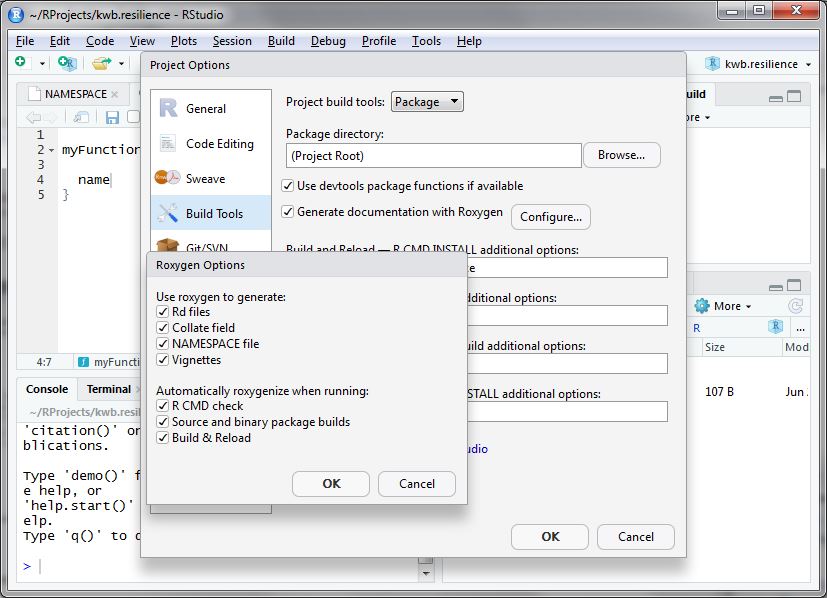
Then click on Configure and a new window opens. Here you
select everything as shown below:

After doing so accept the settings by two times clicking
Ok.
Subsequently click the Check button so that your package
is cross-checked for possible problems (e.g. wrong documentation,
missing package dependencies).
In case of missing package dependencies as shown below these should be added to the DESCRIPTION file.
Namespace dependencies not required: 'fs' 'httr' 'stringr' 'usethis' 'yaml'
See section 'The DESCRIPTION file' in the 'Writing R Extensions'
manual.
* DONE
Status: 1 ERROR

See
  'C:/Users/myname/Documents/RProjects/kwb.pkgbuild.Rcheck/00check.log'
for details.

checking package dependencies ... ERROR
Namespace dependencies not required: 'fs' 'httr' 'stringr' 'usethis' 'yaml'
This can be done using the function
usethis::use_package() as shown below:
pkg_dependencies <- c('fs', 'httr', 'stringr', 'usethis', 'yaml')

sapply(pkg_dependencies, usethis::use_package)

✔ Adding 'fs' to Imports field in DESCRIPTION
● Refer to functions with `fs::fun()`
✔ Adding 'httr' to Imports field in DESCRIPTION
● Refer to functions with `httr::fun()`
✔ Adding 'stringr' to Imports field in DESCRIPTION
● Refer to functions with `stringr::fun()`
✔ Adding 'usethis' to Imports field in DESCRIPTION
● Refer to functions with `usethis::fun()`
✔ Adding 'yaml' to Imports field in DESCRIPTION
● Refer to functions with `yaml::fun()`
Subsequently you should re-click on the Check button
again and it should finish without errors.
R CMD check results
0 errors | 0 warning  | 0 note

R CMD check succeeded
4 Build your package
Now you are ready for building your R package by clicking on the
Install and Restart button. A successful installation
should finish with Done as shown below:
** building package indices
** installing vignettes
** testing if installed package can be loaded
* DONE (kwb.pkgbuild)
In R CMD INSTALL
5 Document your package
5.1 Manually
Finally you should run pkgdown::build_site() in order to
create an documentation website for your R package. Running this command
will store the website in the subfolder docs within your R
package.
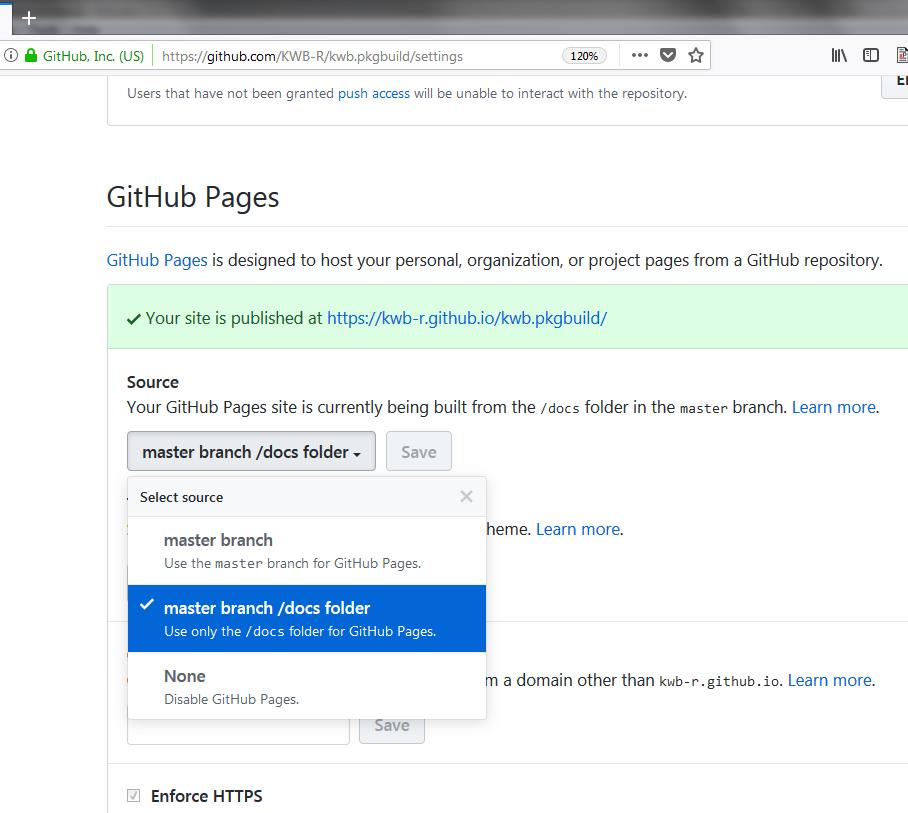
pkgdown::build_site()Once you upload your R package to Github this can be easily used as documentation page that you define in the settings page for your R package which is available at:
https://github.com/KWB-R/
kwb.mycoolrpackage /settings

5.2 Automatically
In case you have already a Github repo defined for your R package you
can also automate the process of updating the
pkgdown::build_site() by with the wrapper function
kwb.pkgbuild::use_autopkgdown(), which:
creates a new branch “gh-pages” where the documentation site is deployed
sets “docs” folder to “.gitignore” (as these files are now build on Travis)
-
prepares Github Actions by:
creating “.github/workflows/” with
kwb.pkgbuild::use_ghactions()creating an empty “gh-pages” branch with
kwb.pkgbuild::create_empty_branch_ghpages()
kwb.pkgbuild::use_autopkgdown()Finally to need to go to:
https://github.com/KWB-R/
kwb.mycoolrpackage /settings
and set the “source” for Github Pages to the branch “gh-pages”. After each successful Travis build the documentation website is now also updated!